Thursday, 28 November 2013

Convert html to pdf on Fedora

wkhtmltopdf is a linux program that convert a webpage(html) to pdf format. The installation instruction of wkhtmltopdf are as below.
yum install wkhtmltopdf
To convert, simply enter as below:
wkhtmltopdf http://google.com test.pdf
However it will errored as it needs a X server:
wkhtmltopdf: cannot connect to X server
To solve the problem, we can install:
yum install xorg-x11-server-Xvfb
Create a shell script as below:
vi wkhtmltopdf.sh
And save with these parameters:
xvfb-run -a -s "-screen 0 640x480x16" wkhtmltopdf $*
And this is the way to run in commandline
wkhtmltopdf.sh http://www.google.com test.pdf

Monday, 20 May 2013

ZEN Loadbalancer


Recently I just came across an article on Zen loadbalancer. Its a Debian ISO, ready to install. The installation and configuration is easy, and straight forward. Below is the feature list taken from its website. After installation, you can configure the LB from its https gui page. Config and testing can be done within minutes after installation.

Features
 Advanced Layer7 load balancing
 Max 30000 concurrent connections in TCP. *
 sNAT load balancing load balancing
 Balance TCP or UDP services
 Balance dataline communications
 HTTP and HTTPS services special options
 HTTP/S persistence client session enabled through cookie, header, basic, ip, url
 SSL wrapper / offload
 Wide range of load balance algorithms like: round robin, weight, priority or hash
 Persistence client sessions
 VLAN Tagging (802.1Q)
 Advanced network configuration for physical, virtual or VLAN interfaces
 Independent route tables for every physical or VLAN NICs
 Advanced checking for backend servers through FarmGuardian
 High availability load balancer service through an active-pasive cluster
 Optional configuration backups system
 Advanced global status with graphs
 Easy administration over https GUI and ssh
 Virtual service configurations can be edited and tuned on-the-fly
 Use NTP sync
 Easy and free updates over APT repositories
 Configure virtual servers and farms as your hardware allows
 Advanced system monitoring with graphs
 Management of SSL certificates
 Real Time syncronization between cluster nodes

*hardware depend

Tuesday, 14 May 2013

mysqlslap benchmark ext3,ext4,xfs on CENTOS6

Following previous post of Bonnie Benchmark for ext3,ext4,xfs, we noticed a better performance of ext4. This time, we will look into the performance difference using mysqlslap on the 3 filesystems. The partition steps will be the same as previous: For ext3 fs:
fdisk /dev/sda
mke2fs -t ext3 /dev/sda4
mount /dev/sda4 /bench -t ext3
bonnie++ -d /bench/ -c 5 -s 1G -n 32 -m ext3

For ext4 fs:
fdisk /dev/sda
mke2fs -t ext4 /dev/sda4
mount /dev/sda4 /bench -t ext4
bonnie++ -d /bench/ -c 5 -s 1G -n 32 -m ext4

For xfs fs:
fdisk /dev/sda
/sbin/mkfs.xfs /dev/sda4
mount /dev/sda4 /bench -t xfs
bonnie++ -d /bench/ -c 5 -s 1G -n 32 -m xfs
To move the mysql datadir from "/var/lib/mysql" to "/bench", by editing mysql config file("/etc/my.cnf"). Replace
#datadir                         = /var/lib/mysql
datadir                         = /bench
Copy mysql datafiles to new location,change the owner,start the mysql server.
cp -fr /var/lib/mysql/* /bench
chown mysql:mysql /bench -R
service mysqld start
Create create_table.sql scripts:
vi create_table.sql
Paste below codes.
create table testTable (text1 varchar(50),number1 int)
insert into testTable (text1,number1) values ('ERf56768ZSDR4567343',7894)
Create queries.sql scripts:
vi queries.sql
Paste below codes.
select * from testTable
Run the mysqlslap
mysqlslap --user=root --password --concurrency=50 --iterations=500 --create=create_table.sql --query=queries.sql
Repeat above steps for different filesystems. The results: mysqlslap benchmarks
EXT3 and EXT4 were good and quite comparable, followed by XFS.

Sunday, 28 April 2013

Setup Load-Balancing Cluster with LVS and Piranha on Centos 6

This setup guide is about building web cluster with a pair of Linux loadbalancers as frontend. It uses Linux Virtual Server(LVS) and Piranha. Piranha is a web-based gui installed in LVS Routers primarily to generating a valid /etc/lvs.cf file. Start by installing LVS on LVS Router.
[root@lvsrouter ~]# yum groupinstall "Load Balancer"
================================================================================
 Package         Arch        Version                         Repository    Size
================================================================================
Installing:
 ipvsadm         x86_64      1.25-10.el6                     base          41 k
 piranha         x86_64      0.8.6-2.el6_4.1                 updates      623 k
Installing for dependencies:
 libedit         x86_64      2.11-4.20080712cvs.1.el6        base          74 k
 libnl           x86_64      1.1-14.el6                      base         121 k
 php             x86_64      5.3.3-22.el6                    base         1.1 M
 php-cli         x86_64      5.3.3-22.el6                    base         2.2 M
 php-common      x86_64      5.3.3-22.el6                    base         524 k

Transaction Summary
================================================================================
Install       7 Package(s)

Total download size: 4.7 M
Installed size: 18 M
Is this ok [y/N]: y
Start piranha and pulse services on reboot.
chkconfig piranha-gui on
chkconfig pulse on
Set a password for piranha web
/usr/sbin/piranha-passwd
Allow ports in iptables
vi /etc/sysconfig/iptables
-A INPUT -m state --state NEW -m tcp -p tcp --dport 3636 -j ACCEPT
Edit piranha config
vi  /etc/sysconfig/ha/conf/httpd.conf
Start the piranha gui service
service piranha-gui start
For LVS router to forward network packets properly to real servers, each LVS router node must have IP forwarding turned on. Turn on packet forwarding by editing sysctl.conf:
vi /etc/sysctl.conf
net.ipv4.ip_forward = 1

Reload sysctl
sysctl -p /etc/sysctl.conf
Start http services on the Real Servers
service httpd start
On the LVS Router, log in to the Piranha web ui to begin configuration. (eg http://(loadbalancer-ip):3636). Using "piranha" as user name, and key in the newly setup password. Enter Primary Router's IP address in "Global Settings"->"Primary server public IP:".
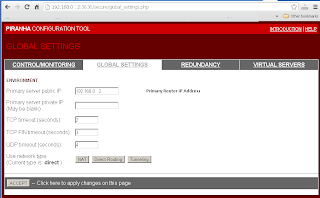
CENTOS Piranha Global Settings
Enter Redundant Router's IP address in "Redundancy"->"Redundant server public IP:".
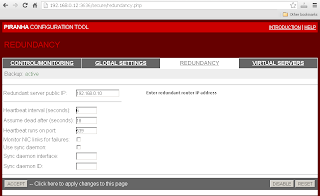
CENTOS Piranha Redundancy
Enter Virtual Server settings in "Virtual Servers"->"Virtual Server".
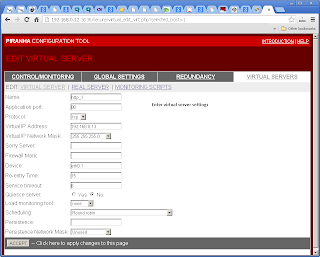
CENTOS Piranha Virtual Servers
Include Real Server settings in "Virtual Servers"->"Real Server".
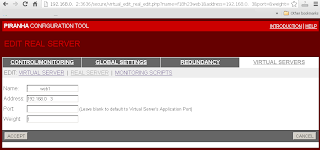
CENTOS Piranha Real Server
On each time the Piranha Gui was changed, have to sync the settings to Backup Routers, and restart the pulse service on both routers.
service pulse restart
To see the virtual server's statistics, use "watch ipvsadm".
[root@lvsrouter ~]# watch ipvsadm 
Create arptables entry for each Virtual IP address on each Real Server(eg Webserver). You can add below command to /etc/rc.local to start on every reboot. If the network adaptor on Real Server is eth0, refer to below, if not change as according:
ip addr add (virtual ip) dev eth0:1
Direct Routing with arptables_jf. To configure each real server to ignore ARP requests for each of the virtual IP addresses the Piranha cluster services:
yum install arptables_jf
arptables -A IN -d (virtual_ip) -j DROP
arptables -A OUT -d (virtual_ip) -j mangle --mangle-ip-s (real_ip)
chkconfig arptables_jf on
service arptables_jf save
service arptables_jf restart
Create a loopback on each Real Server for monitoring Virtual IP.
vi /etc/sysconfig/network-scripts/ifcfg-lo:0

DEVICE=lo:0
IPADDR=(Virtual IP)
NETMASK=255.255.255.255
NETWORK=192.168.0.0
ONBOOT=yes
NAME=loopback

Tuesday, 23 April 2013

PHP: Enable zlib output compression

You can enable php compression as it have a lot of benefits. It reduces the web traffic from host provider to your web. It speeds up the loading of your pages on clients PC. And it is supported by all newer web browser. All you have to do is to set "zlib.output_compression=on" in php.ini:
zlib.output_compression=on

Friday, 19 April 2013

Bonnie Benchmark for ext3, ext4, xfs on CENTOS6

This benchmark was to compare the performance of ext3,ext4,xfs using CENTOS6. Bonnie++ was used to identify performance difference for the 3 filesystems on Linux.

Below were the steps and commands used to create the partitions.

For ext3 fs:
fdisk /dev/sda
mke2fs -t ext3 /dev/sda4
mount /dev/sda4 /bench -t ext3
bonnie++ -d /bench/ -c 5 -s 1G -n 32 -m ext3

For ext4 fs:
fdisk /dev/sda
mke2fs -t ext4 /dev/sda4
mount /dev/sda4 /bench -t ext4
bonnie++ -d /bench/ -c 5 -s 1G -n 32 -m ext4

For xfs fs:
fdisk /dev/sda
/sbin/mkfs.xfs /dev/sda4
mount /dev/sda4 /bench -t xfs
bonnie++ -d /bench/ -c 5 -s 1G -n 32 -m xfs

The results:
1. xfs is having highest SO_PC_KPS (Sequential Output,Per Char,k/sec).
2. ext4 is having highest SI_PC_KPS (Sequential Input,Per Char,k/sec).
3. ext4 is having highest RS_PS (Random Seek,/sec).
4. ext4 is having highest SCC_PS (Sequential Create Create, /sec).
5. ext4 is having highest SCD_PS (Sequential Create Delete, /sec).
6. ext4 is having highest RCC_PS (Random Create Create, /sec).
7. ext4 is having highest RCD_PS (Random Create Delete, /sec).

bonnie,ext3,ext4,xfs

bonnie,ext3,ext4,xfs

bonnie,ext3,ext4,xfs


Thursday, 18 April 2013

To create user account on Linux

To create a new user account, you have to login as root, and use "useradd". To change the password, use "passwd".

[root@localhost /]# useradd john
[root@localhost /]# passwd john

Tuesday, 16 April 2013

How to install Varnish cache on Fedora 18

Varnish is a web accelerator in front of your web server, and it significantly speeds up web content delivery. This guide will show you how to install Varnish cache using YUM on Fedora 18. First, install Varnish and its dependencies:

[root@localhost ~]# yum install varnish


 After above installation, there are 2 config files to setup. "/etc/varnish/default.vcl" and "/etc/varnish/varnish.params".

If you are installing Varnish with Apache Web Server on the same hardware(localhost). Insert below config to "/etc/varnish/default.vcl".

[root@localhost ~]# vi /etc/varnish/default.vcl

backend default {
 .host = "127.0.0.1";
 .port = "80";
}

 By default, Varnish is installed to listen to port 6081. The admin port is installed on port 6082.

[root@localhost ~]# vi /etc/varnish/varnish.params


 Here is my varnish.params:

# Varnish environment configuration description. This was derived from
# the old style sysconfig/defaults settings


# Set this to 1 to make systemd reload try to switch vcl without restart.
RELOAD_VCL=1


# Main configuration file. You probably want to change it.
VARNISH_VCL_CONF=/etc/varnish/default.vcl


# Default address and port to bind to. Blank address means all IPv4
# and IPv6 interfaces, otherwise specify a host name, an IPv4 dotted
# quad, or an IPv6 address in brackets.
# VARNISH_LISTEN_ADDRESS=192.168.1.5
VARNISH_LISTEN_PORT=6081


# Admin interface listen address and port
#VARNISH_ADMIN_LISTEN_ADDRESS=127.0.0.1
VARNISH_ADMIN_LISTEN_PORT=6082

# Shared secret file for admin interface
VARNISH_SECRET_FILE=/etc/varnish/secret

# The minimum and maximum number of worker threads to start
VARNISH_MIN_THREADS=5
VARNISH_MAX_THREADS=1000

# Idle timeout for worker threads
VARNISH_THREAD_TIMEOUT=120

# Backend storage specification, see Storage Types in the varnishd(5)
# man page for details.
VARNISH_STORAGE="file,/var/lib/varnish/varnish_storage.bin,1G"

# Default TTL used when the backend does not specify one
VARNISH_TTL=120

# User and group for the varnishd worker processes
VARNISH_USER=varnish
VARNISH_GROUP=varnish
After you have edited the config files, set the machine to start Varnish on reboot. And start the cache service.

[root@localhost ~]# systemctl enable varnish.service
[root@localhost ~]# systemctl start varnish.service


To access the cache, you can type the IP address of the server on the web browser. Assume the Varnish and Apache Web server is at 192.168.0.5.

http://192.168.0.5:6081

 To bypass varnish cache, you can still reach web server (Apache) at:

http://192.168.0.5

Monday, 15 April 2013

How to host multiple domains on the same http server using the same ip address

In Apache HTTP Server,we can use Name-based Virtual Hosts to host multiply domains on the same server using the same ip address. Using this method, you can have many different hosts sharing the same IP address. This method you need to configure your DNS server to map each hostname to the (same) IP address and set the Apache HTTP Server to recognize the different hostnames. This method of virtual hosting reduce the demand for IP addresses. Supposing you want to host 2 domains on 1 http server,you add the following to httpd.conf.

<virtualhost>
    # The first virtual host is also the default for *:80
    ServerName www.fc18.com
    ServerAlias fc18.com *.fc18.com
    DocumentRoot /var/www/html
</virtualhost>

<virtualhost>
    ServerName other.hosts.com
    ServerAlias hosts.com
    DocumentRoot /var/www/hosts
</virtualhost>

In the DNS server, you can add these to (bind) named.conf:

www.fc18.com.    A 192.168.0.16
fc18.com.        A 192.168.0.16
other.hosts.com. A 192.168.0.16
hosts.com.       A 192.168.0.16 
If you are using hosts file, you can add these to hosts file:

192.168.0.16 www.fc18.com
192.168.0.16 fc18.com
192.168.0.16 www1.fc18.com
192.168.0.16 other.hosts.com
192.168.0.16 hosts.com

Thursday, 11 April 2013

Install APC (php) on Fedora 18

The Alternative PHP Cache (APC) is a bytecode optimization opcode cache for PHP. This free cache leads to faster runtime execution as it stores the final, compiled result in shared memory. To install APC, you can setup using YUM.
[root@localhost ~]# yum install php-pecl-apc
Using YUM method, it will create /etc/php.d/apc.ini , enabling apc extension module "extension = apc.so". If apc.ini is not found, you can insert "extension = apc.so" into php.ini. After apache restart(service httpd restart), you will see apc enabled in phpinfo.php. APC,cache,phpinfo

Wednesday, 10 April 2013

How to setup MySQL Query Cache

The query cache stores the text of a SELECT statement together with the corresponding result that was sent to the client. If an identical statement is received later, the server retrieves the results from the query cache rather than parsing and executing the statement again.

By default query cache size is 0, which is deactivated. To enable it, you can set the query_cache_size to 1000000.

mysql> SET GLOBAL query_cache_size = 1000000;
Query OK, 0 rows affected (0.04 sec) 

mysql> SHOW VARIABLES LIKE 'query_cache_size';
+------------------+--------+ 
|Variable_name     | Value  | 
+------------------+--------+ 
| query_cache_size | 999424 | 
+------------------+--------+ 
1 row in set (0.00 sec)

Create barcodes on CENTOS/FEDORA Linux

To create barcode for Linux, you need to install "barcode" rpm. Suppose you want to create a 13 numbers barcode, and save it to postscript file, and convert the postscript file to pdf, you can do this.

[root@centos6-1 temp]# yum install barcode
[root@centos6-1 temp]# barcode -o test.ps -e EAN -b 9557447805435
[root@centos6-1 temp]# ps2pdf test.ps test.pdf

Tuesday, 9 April 2013

How to install Perl modules using CPAN

To install additional Perl modules found in CPAN, but not in yum, you can download Perl-CPAN package. Lets say you need a Perl module call "Time::HiRes". You can do this.

[root@localhost ~]# yum install perl-CPAN
[root@localhost ~]# cpan
Terminal does not support AddHistory.
cpan shell -- CPAN exploration and modules installation (v1.9800)
Enter 'h' for help.
cpan[1]> install Time::HiRes

How to display multiple memcache servers statistics

To display multiple memcache servers statistics, you can run below php script.


<?php
$servers = array(
    array('127.0.0.1', 11211, 33),
    array('192.168.0.55', 11211, 67)
);

$memcache = new Memcache;
$memcache->addServer('192.168.0.23',11211);
$memcache->addServer('192.168.0.55',11211);
$return = $memcache->getExtendedStats();
$unique_key=array();
foreach ($return as $key => $value) {
    foreach ($value as $key2 => $value2) {       
        array_push($unique_key,$key2);
    }
}

$unique_key=array_unique($unique_key);   
echo "<table border='2' align=\"center\" width=\"100%\" >";
echo "<tr><th/>";
foreach ($return as $key => $value) {   
    echo "<th>$key</th>";   
}

echo "</tr>";
foreach ($unique_key as $key0) {   
    echo "<tr align=\"center\"><td>$key0</td>";   
    foreach ($return as $key => $value) {
        echo "<td>".$return[$key][$key0]."</td>";       
    }
    echo "</tr>";
}
echo "</table>";

?>

Monday, 8 April 2013

Upgrade PECL Memcache extension

The following instructions will download latest PECL Memcache extension. Goto PECL Memcache website. Download the tgz file using wget, and install as follows.

$ mkdir /tmp/temp
$ cd /tmp/temp
$ wget http://pecl.php.net/get/memcache-3.0.8.tgz
$ tar -xzvf memcache-3.0.8.tgz
$ cd memcache-3.0.8/
$ phpize
$ ./configure
$ make
$ make test
$ make install
$ service httpd restart

How to display memcache statistics at bash shell

To display memcache statistics at command prompt, you can enter below command. This command will display memcache statistics like "top", updating the statistic every 2s.

watch "echo stats|nc 127.0.0.1 11211"

How to display memcache statistics with php

To display memcache statistics, you can create a php script as shown below. This scripts uses "getStats" command to display the statistics. You can also format it into a html table.

<?php
$memcache_host="127.0.0.1";
$memcache_port="11211";
$memcache = new Memcache;
$memcache->connect($memcache_host,$memcache_port) or die ("Cannot connect");
$return=($memcache->getStats());
foreach ($return as $key => $value) {
    echo $key." : ".$value."<br>";   
}
?>

How to use memcache with php


Previously I posted an article on how to install Memcache. This time I will show how to use Memcache with PHP. This program will start off with a SQL query statement, hashing the statement and check if the data is stored in memcache.If found, the data will be retrieve from memcache. If it is not found in memcache, then it will query from MySQL database.


<?php
require('connect_db.php'); 
$memcache_host="127.0.0.1";
$memcache_port="11211";
$memcache = new Memcache;
$memcache->connect($memcache_host,$memcache_port) or die ("Cannot connect");

$version = $memcache->getVersion();
echo "Version: ".$version;

$query="select * from exampleDB limit 1;";
$key = md5($query); 
$get_result = $memcache->get($key);

if ($get_result) {   
    print_r($get_result);
    echo "Data retrieved from memcache";
}
else {    
    $result = mysql_query($query);
    if (!$result) {
        die('Invalid query: ' . mysql_error()) 
      }
    $row = mysql_fetch_array($result);
    print_r($row);  
    $memcache->set($key, $row, MEMCACHE_COMPRESSED, 10); 
    echo "Data retrieved from database";
}  
?>

Thursday, 4 April 2013

Enable EPEL and IUS repository for CENTOS6

What is EPEL? Extra Packages for Enterprise Linux (or EPEL) is a Fedora Special Interest Group that creates, maintains, and manages a high quality set of additional packages for Enterprise Linux Server, including, but not limited to, Red Hat Enterprise Linux (RHEL), CentOS and Scientific Linux (SL). First step, download repository rpm from website:
wget http://download.fedoraproject.org/pub/epel/6/i386/epel-release-6-8.noarch.rpm

Install the rpm:
rpm -Uvh epel-release-6-8.noarch.rpm
What is IUS? The IUS Community Project is an effort to package rpms of the latest stable versions of the most commonly requested software on Red Hat Enterprise Linux and CentOS. IUS provides a better way to upgrade PHP/MySQL/Python/Etc on RHEL or CentOS. The project is run by professional Linux Engineers that are primarily focused on RPM Development in the web hosting industry. Download repository rpm from website:
wget http://dl.iuscommunity.org/pub/ius/stable/Redhat/6/x86_64/ius-release-1.0-11.ius.el6.noarch.rpm 

Install the rpm:
rpm -Uvh ius-release-1.0-11.ius.el6.noarch.rpm 

Wednesday, 3 April 2013

Install memcache on CENTOS6


This guide will explain how to install memcache.

To install the server:

yum search memcached
yum install memcached php-pear
chkconfig memcached on
service memcached start

To install php,pecl,memcache extension:

pecl search memcache

The latest stable version is memcache 2.2.7.

You need to install dependencies before installing memcache:
yum install php-devel gcc zlib zlib-devel
To install php extension:
pecl install memcache

Insert the extension in php.ini:
vi /etc/php.ini

Insert below line to php.ini:
extension=memcache.so


To create php test script:

vi /var/www/html/memcache.php

<?php

$memcache = new Memcache;
$memcache->;connect('127.0.0.1', 11211) or die ("Cannot connect");

$version = $memcache->getVersion();
echo "Version: ".$version."
\n"; $tmp_object = new stdClass; $tmp_object->test1 = 'value1'; $tmp_object->test2 = 472; $memcache->set('key', $tmp_object, false, 20) or die ("Cannot save data"); echo "Stored data in the memcache for 20 seconds
\n"; $get_result = $memcache->get('key'); echo "Data from the cache:
\n"; var_dump($get_result); ?>

Tuesday, 2 April 2013

Install the latest mysql server on CENTOS6

How to install the latest mysql server on CENTOS6? CENTOS6 shipped with mysql server 5.1.67 version. To install latest mysql server 5.6.10, you can download the rpm from mysql official download site, and install the rpm individually.

Firstly, navigate to "http://www.mysql.com/downloads/mysql/#downloads" , choose "Oracle and Red Hat Linux 6". Download the rpms as shown below:

wget http://www.mysql.com/get/Downloads/MySQL-5.6/MySQL-client-5.6.10-1.el6.x86_64.rpm/from/http://cdn.mysql.com/
wget http://www.mysql.com/get/Downloads/MySQL-5.6/MySQL-shared-5.6.10-1.el6.x86_64.rpm/from/http://cdn.mysql.com/
wget http://www.mysql.com/get/Downloads/MySQL-5.6/MySQL-server-5.6.10-1.el6.x86_64.rpm/from/http://cdn.mysql.com/
wget http://www.mysql.com/get/Downloads/MySQL-5.6/MySQL-shared-compat-5.6.10-1.el6.x86_64.rpm/from/http://cdn.mysql.com/


Then use md5sum, to check md5 hash on the download site:

md5sum MySQL-shared-compat-5.6.10-1.el6.x86_64.rpm
md5sum MySQL-server-5.6.10-1.el6.x86_64.rpm
md5sum MySQL-shared-5.6.10-1.el6.x86_64.rpm
md5sum MySQL-client-5.6.10-1.el6.x86_64.rpm

If the md5 hash is ok, we can install the rpm in following sequence:

rpm -Uvh MySQL-shared-compat-5.6.10-1.el6.x86_64.rpm
rpm -ivh MySQL-shared-5.6.10-1.el6.x86_64.rpm
rpm -ivh MySQL-server-5.6.10-1.el6.x86_64.rpm
rpm -ivh MySQL-client-5.6.10-1.el6.x86_64.rpm

To turn mysql on when boot:
chkconfig mysql on


To start the mysql service:
service mysql start


To obtain the temporary password:
cat /root/.mysql_secret


To change the mysql root password:
mysqladmin -uroot -p password


Login to the newly installed server using its client:
mysql -uroot -p
These are the steps to install latest mysql on CENTOS. Cheers!

Benchmark PHP mysql vs PHP mysqli

In PHP coding, many of my php scripts are still using php mysql extension. Before taking the time to migrate to php mysqli extension, I have decided to run a simple benchmark between the two. I have written 2 scripts and time it. The first script is "test_mysql.php", the second script is "test_mysqli.php". The result is, the first script took an average of 1.01 sec, the second script took 0.86 sec. "test_mysqli.php" is 17.87% faster than "test_mysql.php".

The scripts were tested on Linux 3.8.4, PHP 5.4.12, MySQL 5.5.30.

First script, test_mysql.php

<?php
//-----Start Timer-------------------------------------------------//       
    $time = microtime();
    $time = explode(" ", $time);
    $time = $time[1] + $time[0];
    $top = $time;
//-----Start Timer-------------------------------------------------//   
for($j=0;$j<1000;$j++)
{  
    $link = mysql_connect($host,$user,$password) or die('Error in Server information');   
    mysql_select_db($db,$link) or die('Can not Select Databasse');   
    $query="select * from com_list where field1='value1';";
    $res = mysql_query($query);  //1 is ok
    if (!$res) {
        die('Invalid query: ' . mysql_error()); }

    while($row = mysql_fetch_array($res)){
    $i++;
    }
    mysql_free_result($res);
    mysql_close($link);
}
    echo "Total lines :".$i;
//-----End Timer-------------------------------------------------//   
    $time = microtime();
    $time = explode(" ", $time);
    $time = $time[1] + $time[0];
    $bottom = $time;
//-----End Timer-------------------------------------------------//
    $loadtime = ($bottom-$top);
    echo ("<br> <br>This page generated in $loadtime seconds");  
?>
Second script, test_mysqli.php
<?php
//-----Start Timer-------------------------------------------------//       
    $time = microtime();
    $time = explode(" ", $time);
    $time = $time[1] + $time[0];
    $top = $time;
//-----Start Timer-------------------------------------------------//       
for($j=0;$j<1000;$j++)
{  
    $link = mysqli_connect($host,$user,$password,$db) or die('Error in Server information');
    $query="select * from com_list where field1='value1';";
    $res = mysqli_query($link,$query);  //1 is ok
    if (!$res) {
        die('Invalid query: ' . mysql_error()); }
    while($row = mysqli_fetch_array($res)){        
    $i++;
    }   
    mysqli_free_result($res);
    mysqli_close($link);
}
    echo "Total lines :".$i;
//-----End Timer-------------------------------------------------//       
    $time = microtime();
    $time = explode(" ", $time);
    $time = $time[1] + $time[0];
    $bottom = $time;
//-----End Timer-------------------------------------------------//           
    $loadtime = ($bottom-$top);
    echo ("<br> <br>This page generated in $loadtime seconds");  
?>


Sunday, 31 March 2013

Working copies of bacula-sd.conf bacula-fd.conf bacula-dir.conf


Normally after updating the config files, I will let the programs to proof read, checking for syntax errors.  To test the syntax of the config files, you can use:

bacula-sd -t /etc/bacula/bacula-sd.conf
bacula-fd -t /etc/bacula/bacula-fd.conf
bacula-dir -t /etc/bacula/bacula-dir.conf


I have attached below, a working copy of bacula-sd.conf, bacula-fd.conf and bacula-dir.conf.
Below is bacula-sd.conf:

# Default Bacula Storage Daemon Configuration file
#
#  For Bacula release 2.4.4 (28 December 2008) -- redhat Enterprise release
#
# You may need to change the name of your tape drive
#   on the "Archive Device" directive in the Device
#   resource.  If you change the Name and/or the
#   "Media Type" in the Device resource, please ensure
#   that dird.conf has corresponding changes.
#

Storage {                             # definition of myself
  Name = bacula-sd
  SDPort = 9103                  # Director's port
  WorkingDirectory = "/var/spool/bacula"
  Pid Directory = "/var/run"
  Maximum Concurrent Jobs = 20
}
#
# List Directors who are permitted to contact Storage daemon
#
Director {
  Name = bacula-dir
  Password = "d84c7934a7a786d26da3d34d5f7c6c86"
}

#
# Restricted Director, used by tray-monitor to get the
#   status of the storage daemon
#
Director {
  Name = bacula-mon
  Password = "d84c7934a7a786d26da3d34d5f7c6c86"
  Monitor = yes
}

#
# Devices supported by this Storage daemon
# To connect, the Director's bacula-dir.conf must have the
#  same Name and MediaType.
#

Device {
  Name = FileStorage
  Media Type = File
  Archive Device =/bacula-backup
  LabelMedia = yes;                   # lets Bacula label unlabeled media
  Random Access = Yes;
  AutomaticMount = yes;               # when device opened, read it
  RemovableMedia = no;
  AlwaysOpen = no;
}

#
# Send all messages to the Director,
# mount messages also are sent to the email address
#

Messages {
  Name = Standard
  director = bacula-dir = all
}

Attached below is a working copy of bacula-fd.conf.
#
# Default  Bacula File Daemon Configuration file
#
#  For Bacula release 2.4.4 (28 December 2008) -- redhat Enterprise release
#
# There is not much to change here except perhaps the
# File daemon Name to
#

#
# List Directors who are permitted to contact this File daemon
#
Director {
  Name = bacula-dir
  Password = "d84c7934a7a786d26da3d34d5f7c6c86"
}
#
# Restricted Director, used by tray-monitor to get the
#   status of the file daemon
#
Director {
  Name = bacula-mon
  Password = "d84c7934a7a786d26da3d34d5f7c6c86"
  Monitor = yes
}
#
# "Global" File daemon configuration specifications
#
FileDaemon {                          # this is me
  Name = bacula-fd
  FDport = 9102                  # where we listen for the director
  WorkingDirectory = /var/spool/bacula
  Pid Directory = /var/run
  Maximum Concurrent Jobs = 20
}
# Send all messages except skipped files back to Director
Messages {
  Name = Standard
  director = bacula-dir = all, !skipped, !restored
}

Attached below is bacula-dir.conf.
#
# Default Bacula Director Configuration file
#
#  The only thing that MUST be changed is to add one or more
#   file or directory names in the Include directive of the
#   FileSet resource.
#
#  For Bacula release 2.4.4 (28 December 2008) -- redhat Enterprise release
#
#  You might also want to change the default email address
#   from root to your address.  See the "mail" and "operator"
#   directives in the Messages resource.
#

Director {                            # define myself
  Name = bacula-dir
  DIRport = 9101                # where we listen for UA connections
  QueryFile = "/etc/bacula/query.sql"
  WorkingDirectory = "/var/spool/bacula"
  PidDirectory = "/var/run"
  Maximum Concurrent Jobs = 1
  Password = "d84c7934a7a786d26da3d34d5f7c6c86"         # Console password
  Messages = Daemon
}

#################################################################
#     Backup for RHEL5_59                                       #
#################################################################
# Define the main nightly save backup job
#   By default, this job will back up to disk in
Job {
  Name = "RHEL5_59"
  Write Bootstrap = "/var/spool/bacula/%c_%n.bsr"
  Type = Backup
  Client = RHEL5_59
  FileSet = "RHEL5_59"
  Schedule = "RHEL5_59"
  Storage = File
  Messages = Standard
  Pool = Default
  Priority = 10
}

# List of files to be backed up
FileSet {
  Name = "RHEL5_59"
  Include {
    Options {
      signature = MD5
    }
    File = /etc
  }

#
# If you backup the root directory, the following two excluded
#   files can be useful
#
#  Exclude {
#    File = /proc
#    File = /tmp
#    File = /.journal
#    File = /.fsck
#  }
}

#
# When to do the backups, full backup on first sunday of the month,
#  differential (i.e. incremental since full) every other sunday,
#  and incremental backups other days
Schedule {
  Name = "RHEL5_59"
  Run = Full 1st sun at 20:26
  Run = Differential 2nd-5th sun at 20:26
  Run = Incremental mon-sat at 20:26
}

# Client (File Services) to backup
Client {
  Name = RHEL5_59
  Address = localhost
  FDPort = 9102
  Catalog = MyCatalog
  Password = "d84c7934a7a786d26da3d34d5f7c6c86"          # password for FileDaemon
  File Retention = 30 days            # 30 days
  Job Retention = 6 months            # six months
  AutoPrune = yes                     # Prune expired Jobs/Files
}

#################################################################
#     Backup for F18_23                                         #
#################################################################
# Define the main nightly save backup job
#   By default, this job will back up to disk in
Job {
  Name = "F18_23"
  Write Bootstrap = "/var/spool/bacula/%c_%n.bsr"
  Type = Backup
  Client = F18_23
  FileSet = "F18_23"
  Schedule = "F18_23"
  Storage = File
  Messages = Standard
  Pool = Default
  Priority = 10
}

# List of files to be backed up
FileSet {
  Name = "F18_23"
  Include {
    Options {
      signature = MD5
    }
    File = /etc
    File = /var/www/
  }

#
# If you backup the root directory, the following two excluded
#   files can be useful
#
#  Exclude {
#    File = /proc
#    File = /tmp
#    File = /.journal
#    File = /.fsck
#  }
}

#
# When to do the backups, full backup on first sunday of the month,
#  differential (i.e. incremental since full) every other sunday,
#  and incremental backups other days
Schedule {
  Name = "F18_23"
  Run = Full 1st sun at 20:26
  Run = Differential 2nd-5th sun at 20:26
  Run = Incremental mon-sat at 20:26
}

# Client (File Services) to backup
Client {
  Name = F18_23
  Address = 192.168.0.23
  FDPort = 9102
  Catalog = MyCatalog
  Password = "d84c7934a7a786d26da3d34d5f7c6c86"          # password for FileDaemon
  File Retention = 30 days            # 30 days
  Job Retention = 6 months            # six months
  AutoPrune = yes                     # Prune expired Jobs/Files
}
#################################################################
#     Backup for CENTOS6                                        #
#################################################################
# Define the main nightly save backup job
#   By default, this job will back up to disk in
Job {
  Name = "CENTOS6_38"
  Write Bootstrap = "/var/spool/bacula/%c_%n.bsr"
  Type = Backup
  Client = CENTOS6_38
  FileSet = "CENTOS6_38"
  Schedule = "CENTOS6_38"
  Storage = File
  Messages = Standard
  Pool = Default
  Priority = 10
}

# List of files to be backed up
FileSet {
  Name = "CENTOS6_38"
  Include {
    Options {
      signature = MD5
    }
    File = /etc
    File = /var/www/
  }

#
# If you backup the root directory, the following two excluded
#   files can be useful
#
#  Exclude {
#    File = /proc
#    File = /tmp
#    File = /.journal
#    File = /.fsck
#  }
}

#
# When to do the backups, full backup on first sunday of the month,
#  differential (i.e. incremental since full) every other sunday,
#  and incremental backups other days
Schedule {
  Name = "CENTOS6_38"
  Run = Full 1st sun at 20:26
  Run = Differential 2nd-5th sun at 20:26
  Run = Incremental mon-sat at 20:26
}
# Client (File Services) to backup
Client {
  Name = CENTOS6_38
  Address = 192.168.0.38
  FDPort = 9102
  Catalog = MyCatalog
  Password = "d84c7934a7a786d26da3d34d5f7c6c86"          # password for FileDaemon
  File Retention = 30 days            # 30 days
  Job Retention = 6 months            # six months
  AutoPrune = yes                     # Prune expired Jobs/Files
}

#################################################################
#     Backup for Catalog on RHEL5_59                            #
#################################################################

# Backup the catalog database (after the nightly save)
Job {
  Name = "BackupCatalog"
  Level = Full
  FileSet="Catalog"
  Schedule = "WeeklyCycleAfterBackup"
  # This creates an ASCII copy of the catalog
  # Arguments to make_catalog_backup.pl are:
  #  make_catalog_backup.pl 
  RunBeforeJob = "/usr/libexec/bacula/make_catalog_backup.pl MyCatalog"
  # This deletes the copy of the catalog
  RunAfterJob  = "/usr/libexec/bacula/delete_catalog_backup"
  Write Bootstrap = "/var/spool/bacula/%c_%n.bsr"
  Priority = 11                   # run after main backup

  Type = Backup
  Client = RHEL5_59
  Storage = File
  Messages = Standard
  Pool = Default
}

# This is the backup of the catalog
FileSet {
  Name = "Catalog"
  Include {
    Options {
      signature = MD5
    }
    File = /var/spool/bacula/bacula.sql
  }
}

# This schedule does the catalog. It starts after the WeeklyCycle
Schedule {
  Name = "WeeklyCycleAfterBackup"
  Run = Full sun-sat at 23:10
}


#
# Standard Restore template, to be changed by Console program
#  Only one such job is needed for all Jobs/Clients/Storage ...
#
Job {
  Name = "RestoreFiles"
  Type = Restore
  Client=RHEL5_59
  FileSet="RHEL5_59"
  Storage = File
  Pool = Default
  Messages = Standard
  Where = /bacula-restores
}

# Definition of file storage device
Storage {
  Name = File
  Address = localhost                # N.B. Use a fully qualified name here
  SDPort = 9103
  Password = "d84c7934a7a786d26da3d34d5f7c6c86"
  Device = FileStorage
  Media Type = File
}
# Generic catalog service
Catalog {
  Name = MyCatalog
  dbname = "bacula"; dbuser = "bacula"; dbpassword = ""
}

# Reasonable message delivery -- send most everything to email address
#  and to the console
Messages {
  Name = Standard
#
# NOTE! If you send to two email or more email addresses, you will need
#  to replace the %r in the from field (-f part) with a single valid
#  email address in both the mailcommand and the operatorcommand.
#  What this does is, it sets the email address that emails would display
#  in the FROM field, which is by default the same email as they're being
#  sent to.  However, if you send email to more than one address, then
#  you'll have to set the FROM address manually, to a single address.
#  for example, a 'no-reply@mydomain.com', is better since that tends to
#  tell (most) people that its coming from an automated source.

#
  mailcommand = "/usr/sbin/bsmtp -h localhost -f \"\(Bacula\) \<%r\>\" -s \"Bacula: %t %e of %c %l\" %r"
  operatorcommand = "/usr/sbin/bsmtp -h localhost -f \"\(Bacula\) \<%r\>\" -s \"Bacula: Intervention needed for %j\" %r"
  mail = root@localhost = all, !skipped
  operator = root@localhost = mount
  console = all, !skipped, !saved
# Default pool definition
Pool {
  Name = Default
  Pool Type = Backup
  Recycle = yes                       # Bacula can automatically recycle Volumes
  AutoPrune = yes                     # Prune expired volumes
  Volume Retention = 365 days         # one year
  Label Format = "File-"
}

# Scratch pool definition
Pool {
  Name = Scratch
  Pool Type = Backup
}

#
# Restricted console used by tray-monitor to get the status of the director
#
Console {
  Name = bacula-mon
  Password = "d84c7934a7a786d26da3d34d5f7c6c86"
  CommandACL = status, .status
}

Tuesday, 26 March 2013

Compare php 5.3 vs 5.4

How much faster is php5.4 compared to php5.3? It was benchmarked , 5.4 is almost twice as fast as 5.3. PHP 5.4 significantly improves performance, memory footprint and fixes over 100 bugs.

PHP 5.4.0 offers a wide range of new features:

Support for traits has been added.
Short array syntax has been added, e.g. $a = [1, 2, 3, 4]; or $a = ['one' => 1, 'two' => 2, 'three' => 3, 'four' => 4];.
Function array dereferencing has been added, e.g. foo()[0].
Closures now support $this.
<?= is now always available, regardless of the short_open_tag php.ini option.
Class member access on instantiation has been added, e.g. (new Foo)->bar().
Class::{expr}() syntax is now supported.
Binary number format has been added, e.g. 0b001001101.
Improved parse error messages and improved incompatible arguments warnings.
The session extension can now track the upload progress of files.
Built-in development web server in CLI mode.

Raspberry Pi


It has a TV out and an HDMI Port. I don't know any family without a TV (well very few, but they don't have a TV by choice and not because they can't afford one, however they have a computer and therefore a computer display). RasPi is a UK Company. The European community is regulating cellphone chargers. They must use an USB Micro-B connector (with 800-1000 mA output). Guess what? This is also the sort of power supply the RasPi needs. Since most Europeans get a new cellphone every 1-2 years, these chargers are disposable (every new phone comes with a new charger even though the old one is still working perfectly). So display available, check. Power supply available, check. Now all we need is an SD card, a Keyboard and a mouse (USB). A cheap keyboard and a cheap mouse would not cost more than 15 us dollars. And if I were a smart kid, I'd ask family and friends if I could buy used ones (which I probably would get donated). Nearly all families already have a mac or windows pc (but might not want their children to break it while experimenting) mouse and keyboard could be used from the already available computer. Well, now we have only one item left that is missing, the SD card. Many digital cameras are replaced here with smart phones. It's not the same but I see those aging cameras laying around in many house holds. Guess what, they often use SD cards. But since the SD card needs to be reformatted and somewhat inserted permanently into the device, it might be reasonable to buy a separate one. This leaves us with one extra expense: a new SD card for $20-30, big deal! I personally think the RasPi team has a very neat design there, don't you?

Upgrade mysql (5.1) to mysql55 on CENTOS6

To upgrade from mysql (default ver 5.1) to mysql55 (IUS ver 5.5):

Replace residual mysql component to mysql55:
[root@localhost ~]# yum replace mysql-libs --replace-with mysql55


Install server and client:
[root@localhost ~]# yum install mysql55-server mysql55


Start server upon reboot:
[root@localhost ~]# chkconfig mysqld on 


Start server service:
[root@localhost ~]# service mysqld start


Change root password:
[root@localhost ~]# mysqladmin -u root password

Upgrade php53u to php54 on CENTOS5

To upgrade php53/php53u to php54 on CENTOS5.

Enable IUS and EPEL:

[root@example ~]# rpm -Uvh http://dl.iuscommunity.org/pub/ius/stable/CentOS/5/x86_64/ius-release-1.0-10.ius.centos5.noarch.rpm
[root@example ~]# rpm -Uvh http://dl.iuscommunity.org/pub/ius/stable/CentOS/5/x86_64/epel-release-5-4.noarch.rpm


Install yum replace plugin:
[root@example ~]# yum install yum-plugin-replace
Upgrade php53 to php4:
[root@example ~]# yum replace php53u --replace-with php54
Verify php version:
[root@example ~]# php -v
Restart httpd:
[root@example ~]# service httpd restart

Monday, 25 March 2013

Installing Bacula Console (Gnome) on CENTOS5

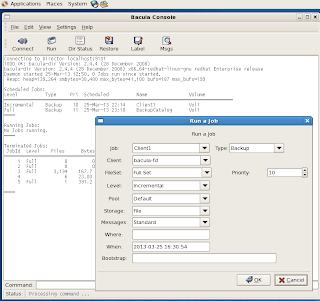
If you are using Gnome Desktop, you can access Bacula using Bacula Console (Gnome)

Below are the installation steps:

[root@example bacula-web]# yum install bacula-console-gnome


Change the director ipaddress and password

[root@example bacula-web]# vi /etc/bacula/bgnome-console.conf


Director {

  Name = bacula-dir

  DIRport = 9101

  address = localhost

  Password = "d84c7934a7a7826da3d34d5f7c6c86"

}


ConsoleFont {

  Name = Default

  Font = "LucidaTypewriter 9"

}

Installing Bacula-Web on CENTOS5


Bacula-Web is a monitoring and reporting web gui for Bacula.

[root@example html]# cd /var/www/html/

[root@example html]# yum install php54-common php54-pear php54-pdo php54 php54-gd php54-cli php54-pecl-apc php54-mysql  

[root@example html]# mkdir bacula-web

[root@example html]# cd bacula-web

[root@example bacula-web]# wget http://www.bacula-web.org/tl_files/downloads/bacula-web-5.2.12.tar.gz

[root@example bacula-web]# tar -xzvf bacula-web-5.2.12.tar.gz

[root@example bacula-web]# cd ..

[root@example html]# chown -Rv apache:apache ./bacula-web

[root@example html]# chmod -Rv u=rx,g=rx,o=rx ./bacula-web

[root@example html]# chmod -v ug+w ./bacula-web/application/view/cache

[root@example config]# cd ./bacula-web/application/config

[root@example config]# cp -v config.php.sample config.php

[root@example config]# chown -v apache: config.php

[root@example config]# vi config.php


To test your installation of Bacula-Web, follow this link:

http://ipaddress/bacula-web/test.php

To goto the web:

http://ipaddress/bacula-web

Sunday, 24 March 2013

Installing Bacula on CENTOS5

Installing Bacula on CENTOS5 using YUM package-management utility. You have to have root access to install and run Bacula properly. A database server (eg MySQL) is needed to manage backup details. In this case, you will need mysql root access (ie MySQL root password). In this guide, it is assumed that the Bacula Director,File daemon,Storage daemon are installed in the same computer/server. When you want to backup across more computers/servers, just need to declare more clients and update the addresses.

Bacula is an Open Source Network Backup program that allows system admin to backup, recover data from servers and computer. More details can be obtained from its official website. (http://www.bacula.org/en)

Lets start with the yum install:

yum install bacula-client bacula-director-mysql bacula-storage-mysql bacula-traymonitor bacula-common bacula-director-common bacula-storage-common bacula-console


YUM will then go thru the dependency and add additional packages to install. Enter 'y' to proceed to install all required packages.

Is this ok [y/N]: y


Run below scripts to create and link mysql tables to Bacula:

/usr/libexec/bacula/grant_mysql_privileges -uroot -p
/usr/libexec/bacula/create_mysql_database -uroot -p
/usr/libexec/bacula/make_mysql_tables -uroot -p
/usr/libexec/bacula/grant_bacula_privileges -uroot -p
The Bacula is made up of 4 basic components: Director, File daemon(FD), Storage daemon(SD),Console programs. For security, lets change their default password. To generate a password hash:

[root@example ~]# echo "mypassword" |md5sum
d84c7934a7a786d26da3d34d5f7c6c86  -

For simplicity, I am using the above password hash to all password fields in below config files:

vi /etc/bacula/bacula-dir.conf
vi /etc/bacula/bacula-fd.conf
vi /etc/bacula/bacula-sd.conf
vi /etc/bacula/bconsole.conf
vi /etc/bacula/tray-monitor.conf

The default storage location is in /tmp. To change to another directory:

mkdir /bacula-backup


vi /etc/bacula/bacula-sd.conf

change

Archive Device = /tmp


to

Archive Device = /bacula-backup

To update the address of the file daemon:
vi /etc/bacula/bacula-dir.conf

Client {
  Name = bacula-fd
  Address = client.example.com
  FDPort = 9102
  Catalog = MyCatalog

To

Client {
  Name = bacula-fd
  Address = localhost
  FDPort = 9102
  Catalog = MyCatalog


and


Storage {

  Name = File

# Do not use "localhost" here

  Address = XXXXXXXXXX                # N.B. Use a fully qualified name here

  SDPort = 9103


To
Storage {

  Name = File

# Do not use "localhost" here

  Address = localhost                # N.B. Use a fully qualified name here

  SDPort = 9103

(Yes, the comments says do not use "localhost" and I used it. You can replace the address with a FQDN that is used as Bacula backup server.)

To enable the services:
chkconfig bacula-sd on

chkconfig bacula-fd on

chkconfig bacula-dir on


To turn on the services:
service bacula-fd start

service bacula-sd start

service bacula-dir start


To create volumes, run:
[root@example ~]# bconsole
Connecting to Director localhost:9101
1000 OK: bacula-dir Version: 2.4.4 (28 December 2008)
Enter a period to cancel a command.
*label
Automatically selected Catalog: MyCatalog
Using Catalog "MyCatalog"
Automatically selected Storage: File
Enter new Volume name: vol
Defined Pools:
     1: Default
     2: Scratch
Select the Pool (1-2): 1
Connecting to Storage daemon File at localhost:9103 ...
Sending label command for Volume "vol" Slot 0 ...
3000 OK label. VolBytes=195 DVD=0 Volume="vol" Device="FileStorage" (/bacula-backup)
Catalog record for Volume "vol", Slot 0  successfully created.
Requesting to mount FileStorage ...
3906 File device "FileStorage" (/bacula-backup) is always mounted.

search iomeweekly