Showing posts with label CENTOS6. Show all posts

Wednesday, 14 May 2014

Static IP network configuration on CentOS 6

Below are the templates to configure CentOS for static ip:
# cat /etc/hosts
127.0.0.1       localhost.localdomain localhost
::1             localhost6.localdomain6 localhost6
192.168.1.41    r65-1.local     r65-1
# cat /etc/sysconfig/network
NETWORKING=yes
NETWORKING_IPV6=no
HOSTNAME=r65-1
GATEWAY=192.168.1.1
# cat /etc/sysconfig/network-scripts/ifcfg-eth0
DEVICE=eth0
BOOTPROTO=none
IPADDR=192.168.1.41
NETMASK=255.255.255.0
ONBOOT=yes
TYPE=Ethernet
PREFIX=24
GATEWAY=192.168.1.1
DNS1=192.168.1.1
DOMAIN=local
DEFROUTE=no
IPV4_FAILURE_FATAL=yes
IPV6INIT=no
NAME="System eth0"
# cat /etc/resolv.conf
search local
nameserver 192.168.1.1

Tuesday, 14 May 2013

mysqlslap benchmark ext3,ext4,xfs on CENTOS6

Following previous post of Bonnie Benchmark for ext3,ext4,xfs, we noticed a better performance of ext4. This time, we will look into the performance difference using mysqlslap on the 3 filesystems. The partition steps will be the same as previous: For ext3 fs:
fdisk /dev/sda
mke2fs -t ext3 /dev/sda4
mount /dev/sda4 /bench -t ext3
bonnie++ -d /bench/ -c 5 -s 1G -n 32 -m ext3

For ext4 fs:
fdisk /dev/sda
mke2fs -t ext4 /dev/sda4
mount /dev/sda4 /bench -t ext4
bonnie++ -d /bench/ -c 5 -s 1G -n 32 -m ext4

For xfs fs:
fdisk /dev/sda
/sbin/mkfs.xfs /dev/sda4
mount /dev/sda4 /bench -t xfs
bonnie++ -d /bench/ -c 5 -s 1G -n 32 -m xfs
To move the mysql datadir from "/var/lib/mysql" to "/bench", by editing mysql config file("/etc/my.cnf"). Replace
#datadir                         = /var/lib/mysql
datadir                         = /bench
Copy mysql datafiles to new location,change the owner,start the mysql server.
cp -fr /var/lib/mysql/* /bench
chown mysql:mysql /bench -R
service mysqld start
Create create_table.sql scripts:
vi create_table.sql
Paste below codes.
create table testTable (text1 varchar(50),number1 int)
insert into testTable (text1,number1) values ('ERf56768ZSDR4567343',7894)
Create queries.sql scripts:
vi queries.sql
Paste below codes.
select * from testTable
Run the mysqlslap
mysqlslap --user=root --password --concurrency=50 --iterations=500 --create=create_table.sql --query=queries.sql
Repeat above steps for different filesystems. The results: mysqlslap benchmarks
EXT3 and EXT4 were good and quite comparable, followed by XFS.

Sunday, 28 April 2013

Setup Load-Balancing Cluster with LVS and Piranha on Centos 6

This setup guide is about building web cluster with a pair of Linux loadbalancers as frontend. It uses Linux Virtual Server(LVS) and Piranha. Piranha is a web-based gui installed in LVS Routers primarily to generating a valid /etc/lvs.cf file. Start by installing LVS on LVS Router.
[root@lvsrouter ~]# yum groupinstall "Load Balancer"
================================================================================
 Package         Arch        Version                         Repository    Size
================================================================================
Installing:
 ipvsadm         x86_64      1.25-10.el6                     base          41 k
 piranha         x86_64      0.8.6-2.el6_4.1                 updates      623 k
Installing for dependencies:
 libedit         x86_64      2.11-4.20080712cvs.1.el6        base          74 k
 libnl           x86_64      1.1-14.el6                      base         121 k
 php             x86_64      5.3.3-22.el6                    base         1.1 M
 php-cli         x86_64      5.3.3-22.el6                    base         2.2 M
 php-common      x86_64      5.3.3-22.el6                    base         524 k

Transaction Summary
================================================================================
Install       7 Package(s)

Total download size: 4.7 M
Installed size: 18 M
Is this ok [y/N]: y
Start piranha and pulse services on reboot.
chkconfig piranha-gui on
chkconfig pulse on
Set a password for piranha web
/usr/sbin/piranha-passwd
Allow ports in iptables
vi /etc/sysconfig/iptables
-A INPUT -m state --state NEW -m tcp -p tcp --dport 3636 -j ACCEPT
Edit piranha config
vi  /etc/sysconfig/ha/conf/httpd.conf
Start the piranha gui service
service piranha-gui start
For LVS router to forward network packets properly to real servers, each LVS router node must have IP forwarding turned on. Turn on packet forwarding by editing sysctl.conf:
vi /etc/sysctl.conf
net.ipv4.ip_forward = 1

Reload sysctl
sysctl -p /etc/sysctl.conf
Start http services on the Real Servers
service httpd start
On the LVS Router, log in to the Piranha web ui to begin configuration. (eg http://(loadbalancer-ip):3636). Using "piranha" as user name, and key in the newly setup password. Enter Primary Router's IP address in "Global Settings"->"Primary server public IP:".
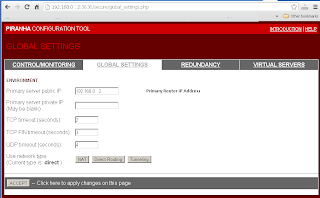
CENTOS Piranha Global Settings
Enter Redundant Router's IP address in "Redundancy"->"Redundant server public IP:".
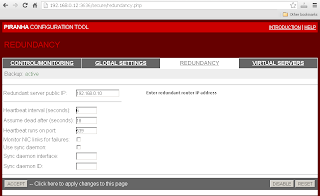
CENTOS Piranha Redundancy
Enter Virtual Server settings in "Virtual Servers"->"Virtual Server".
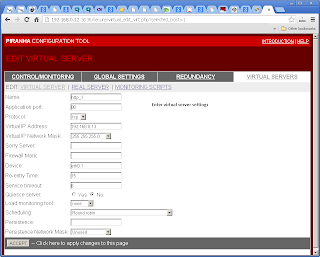
CENTOS Piranha Virtual Servers
Include Real Server settings in "Virtual Servers"->"Real Server".
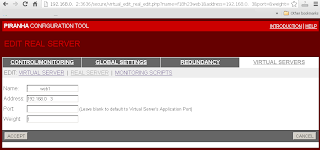
CENTOS Piranha Real Server
On each time the Piranha Gui was changed, have to sync the settings to Backup Routers, and restart the pulse service on both routers.
service pulse restart
To see the virtual server's statistics, use "watch ipvsadm".
[root@lvsrouter ~]# watch ipvsadm 
Create arptables entry for each Virtual IP address on each Real Server(eg Webserver). You can add below command to /etc/rc.local to start on every reboot. If the network adaptor on Real Server is eth0, refer to below, if not change as according:
ip addr add (virtual ip) dev eth0:1
Direct Routing with arptables_jf. To configure each real server to ignore ARP requests for each of the virtual IP addresses the Piranha cluster services:
yum install arptables_jf
arptables -A IN -d (virtual_ip) -j DROP
arptables -A OUT -d (virtual_ip) -j mangle --mangle-ip-s (real_ip)
chkconfig arptables_jf on
service arptables_jf save
service arptables_jf restart
Create a loopback on each Real Server for monitoring Virtual IP.
vi /etc/sysconfig/network-scripts/ifcfg-lo:0

DEVICE=lo:0
IPADDR=(Virtual IP)
NETMASK=255.255.255.255
NETWORK=192.168.0.0
ONBOOT=yes
NAME=loopback

Friday, 19 April 2013

Bonnie Benchmark for ext3, ext4, xfs on CENTOS6

This benchmark was to compare the performance of ext3,ext4,xfs using CENTOS6. Bonnie++ was used to identify performance difference for the 3 filesystems on Linux.

Below were the steps and commands used to create the partitions.

For ext3 fs:
fdisk /dev/sda
mke2fs -t ext3 /dev/sda4
mount /dev/sda4 /bench -t ext3
bonnie++ -d /bench/ -c 5 -s 1G -n 32 -m ext3

For ext4 fs:
fdisk /dev/sda
mke2fs -t ext4 /dev/sda4
mount /dev/sda4 /bench -t ext4
bonnie++ -d /bench/ -c 5 -s 1G -n 32 -m ext4

For xfs fs:
fdisk /dev/sda
/sbin/mkfs.xfs /dev/sda4
mount /dev/sda4 /bench -t xfs
bonnie++ -d /bench/ -c 5 -s 1G -n 32 -m xfs

The results:
1. xfs is having highest SO_PC_KPS (Sequential Output,Per Char,k/sec).
2. ext4 is having highest SI_PC_KPS (Sequential Input,Per Char,k/sec).
3. ext4 is having highest RS_PS (Random Seek,/sec).
4. ext4 is having highest SCC_PS (Sequential Create Create, /sec).
5. ext4 is having highest SCD_PS (Sequential Create Delete, /sec).
6. ext4 is having highest RCC_PS (Random Create Create, /sec).
7. ext4 is having highest RCD_PS (Random Create Delete, /sec).

bonnie,ext3,ext4,xfs

bonnie,ext3,ext4,xfs

bonnie,ext3,ext4,xfs


Thursday, 4 April 2013

Enable EPEL and IUS repository for CENTOS6

What is EPEL? Extra Packages for Enterprise Linux (or EPEL) is a Fedora Special Interest Group that creates, maintains, and manages a high quality set of additional packages for Enterprise Linux Server, including, but not limited to, Red Hat Enterprise Linux (RHEL), CentOS and Scientific Linux (SL). First step, download repository rpm from website:
wget http://download.fedoraproject.org/pub/epel/6/i386/epel-release-6-8.noarch.rpm

Install the rpm:
rpm -Uvh epel-release-6-8.noarch.rpm
What is IUS? The IUS Community Project is an effort to package rpms of the latest stable versions of the most commonly requested software on Red Hat Enterprise Linux and CentOS. IUS provides a better way to upgrade PHP/MySQL/Python/Etc on RHEL or CentOS. The project is run by professional Linux Engineers that are primarily focused on RPM Development in the web hosting industry. Download repository rpm from website:
wget http://dl.iuscommunity.org/pub/ius/stable/Redhat/6/x86_64/ius-release-1.0-11.ius.el6.noarch.rpm 

Install the rpm:
rpm -Uvh ius-release-1.0-11.ius.el6.noarch.rpm 

Wednesday, 3 April 2013

Install memcache on CENTOS6


This guide will explain how to install memcache.

To install the server:

yum search memcached
yum install memcached php-pear
chkconfig memcached on
service memcached start

To install php,pecl,memcache extension:

pecl search memcache

The latest stable version is memcache 2.2.7.

You need to install dependencies before installing memcache:
yum install php-devel gcc zlib zlib-devel
To install php extension:
pecl install memcache

Insert the extension in php.ini:
vi /etc/php.ini

Insert below line to php.ini:
extension=memcache.so


To create php test script:

vi /var/www/html/memcache.php

<?php

$memcache = new Memcache;
$memcache->;connect('127.0.0.1', 11211) or die ("Cannot connect");

$version = $memcache->getVersion();
echo "Version: ".$version."
\n"; $tmp_object = new stdClass; $tmp_object->test1 = 'value1'; $tmp_object->test2 = 472; $memcache->set('key', $tmp_object, false, 20) or die ("Cannot save data"); echo "Stored data in the memcache for 20 seconds
\n"; $get_result = $memcache->get('key'); echo "Data from the cache:
\n"; var_dump($get_result); ?>

Tuesday, 2 April 2013

Install the latest mysql server on CENTOS6

How to install the latest mysql server on CENTOS6? CENTOS6 shipped with mysql server 5.1.67 version. To install latest mysql server 5.6.10, you can download the rpm from mysql official download site, and install the rpm individually.

Firstly, navigate to "http://www.mysql.com/downloads/mysql/#downloads" , choose "Oracle and Red Hat Linux 6". Download the rpms as shown below:

wget http://www.mysql.com/get/Downloads/MySQL-5.6/MySQL-client-5.6.10-1.el6.x86_64.rpm/from/http://cdn.mysql.com/
wget http://www.mysql.com/get/Downloads/MySQL-5.6/MySQL-shared-5.6.10-1.el6.x86_64.rpm/from/http://cdn.mysql.com/
wget http://www.mysql.com/get/Downloads/MySQL-5.6/MySQL-server-5.6.10-1.el6.x86_64.rpm/from/http://cdn.mysql.com/
wget http://www.mysql.com/get/Downloads/MySQL-5.6/MySQL-shared-compat-5.6.10-1.el6.x86_64.rpm/from/http://cdn.mysql.com/


Then use md5sum, to check md5 hash on the download site:

md5sum MySQL-shared-compat-5.6.10-1.el6.x86_64.rpm
md5sum MySQL-server-5.6.10-1.el6.x86_64.rpm
md5sum MySQL-shared-5.6.10-1.el6.x86_64.rpm
md5sum MySQL-client-5.6.10-1.el6.x86_64.rpm

If the md5 hash is ok, we can install the rpm in following sequence:

rpm -Uvh MySQL-shared-compat-5.6.10-1.el6.x86_64.rpm
rpm -ivh MySQL-shared-5.6.10-1.el6.x86_64.rpm
rpm -ivh MySQL-server-5.6.10-1.el6.x86_64.rpm
rpm -ivh MySQL-client-5.6.10-1.el6.x86_64.rpm

To turn mysql on when boot:
chkconfig mysql on


To start the mysql service:
service mysql start


To obtain the temporary password:
cat /root/.mysql_secret


To change the mysql root password:
mysqladmin -uroot -p password


Login to the newly installed server using its client:
mysql -uroot -p
These are the steps to install latest mysql on CENTOS. Cheers!

search iomeweekly