Showing posts with label LAN. Show all posts
Showing posts with label LAN. Show all posts
Monday, 30 March 2015
Automatic WAN failover (Multiple WAN) using ClearOS
In this tutorial, we look into how to configure Automatic Failover of 2 WAN Network using ClearOS.
Setup:
2 Internet Links (WAN)
1 LAN Link
Note: For ClearOS, you will need to have at least 1GB of ram.
Insert the DVD rom and lets start:
Install or upgrade an existing system
Install with Basic Storage Device.
Enter your root password twice.
It will take a while to copy the system files.
After it is done, let it reboot.
Login using the root credentials setup earlier.
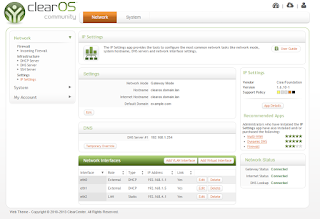
At install wizard,click on next,and select Gateway Mode,click next.
eth0: External,DHCP,isp1.domain.lan
eth1: External,DHCP,isp2.domain.lan
eth2: LAN,Static,192.168.4.1,255.255.255.0,Enable DHCP Server
DNS Servers: Next,configure your DNS.
Select Support Edition: You can choose Community Edition or Professional Edition.
Software updates: Let it update its latest software.
System Registration: If you have an account, enter the login details. If you do not have, you can create an account.
Internet domain: Enter your domain.
Hostname: Enter your hostname.
Date and Time: Sync your time
Getting Started: Click Next
App Selection: Click Next
App Review: Click Next
Down and Install: Click Next
 After above setup, the LAN link will act as a gateway, routing thru active link 1 or 2.
 Have a try and let me know if it works for you.
Subscribe to:
Posts
(
Atom
)