Monday 20 May 2013
ZEN Loadbalancer
Recently I just came across an article on Zen loadbalancer. Its a Debian ISO, ready to install. The installation and configuration is easy, and straight forward. Below is the feature list taken from its website. After installation, you can configure the LB from its https gui page. Config and testing can be done within minutes after installation.
Features
Advanced Layer7 load balancing
Max 30000 concurrent connections in TCP. *
sNAT load balancing load balancing
Balance TCP or UDP services
Balance dataline communications
HTTP and HTTPS services special options
HTTP/S persistence client session enabled through cookie, header, basic, ip, url
SSL wrapper / offload
Wide range of load balance algorithms like: round robin, weight, priority or hash
Persistence client sessions
VLAN Tagging (802.1Q)
Advanced network configuration for physical, virtual or VLAN interfaces
Independent route tables for every physical or VLAN NICs
Advanced checking for backend servers through FarmGuardian
High availability load balancer service through an active-pasive cluster
Optional configuration backups system
Advanced global status with graphs
Easy administration over https GUI and ssh
Virtual service configurations can be edited and tuned on-the-fly
Use NTP sync
Easy and free updates over APT repositories
Configure virtual servers and farms as your hardware allows
Advanced system monitoring with graphs
Management of SSL certificates
Real Time syncronization between cluster nodes
*hardware depend
Tuesday 14 May 2013
mysqlslap benchmark ext3,ext4,xfs on CENTOS6
Following previous post of Bonnie Benchmark for ext3,ext4,xfs, we noticed a better performance of ext4. This time, we will look into the performance difference using mysqlslap on the 3 filesystems.
The partition steps will be the same as previous:
For ext3 fs:
For ext4 fs:
For xfs fs:
 EXT3 and EXT4 were good and quite comparable, followed by XFS.
fdisk /dev/sda
mke2fs -t ext3 /dev/sda4
mount /dev/sda4 /bench -t ext3
bonnie++ -d /bench/ -c 5 -s 1G -n 32 -m ext3
For ext4 fs:
fdisk /dev/sda
mke2fs -t ext4 /dev/sda4
mount /dev/sda4 /bench -t ext4
bonnie++ -d /bench/ -c 5 -s 1G -n 32 -m ext4
For xfs fs:
fdisk /dev/sda
/sbin/mkfs.xfs /dev/sda4
mount /dev/sda4 /bench -t xfs
bonnie++ -d /bench/ -c 5 -s 1G -n 32 -m xfs
To move the mysql datadir from "/var/lib/mysql" to "/bench", by editing mysql config file("/etc/my.cnf"). Replace
#datadir                         = /var/lib/mysql
datadir                         = /bench
Copy mysql datafiles to new location,change the owner,start the mysql server.
cp -fr /var/lib/mysql/* /bench
chown mysql:mysql /bench -R
service mysqld start
Create create_table.sql scripts:
vi create_table.sqlPaste below codes.
create table testTable (text1 varchar(50),number1 int)
insert into testTable (text1,number1) values ('ERf56768ZSDR4567343',7894)
Create queries.sql scripts:
vi queries.sqlPaste below codes.
select * from testTableRun the mysqlslap
mysqlslap --user=root --password --concurrency=50 --iterations=500 --create=create_table.sql --query=queries.sqlRepeat above steps for different filesystems. The results:
 EXT3 and EXT4 were good and quite comparable, followed by XFS.
Sunday 28 April 2013
Setup Load-Balancing Cluster with LVS and Piranha on Centos 6
This setup guide is about building web cluster with a pair of Linux loadbalancers as frontend. It uses Linux Virtual Server(LVS) and Piranha. Piranha is a web-based gui installed in LVS Routers primarily to generating a valid /etc/lvs.cf file.
Start by installing LVS on LVS Router.
Reload sysctl
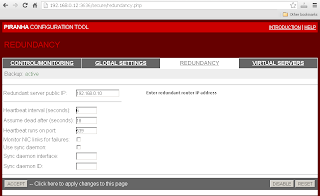
Enter Redundant Router's IP address in "Redundancy"->"Redundant server public IP:".
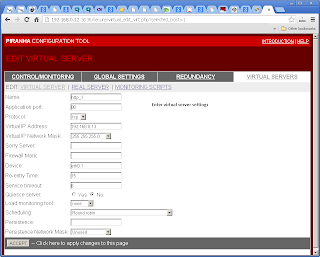
Enter Virtual Server settings in "Virtual Servers"->"Virtual Server".
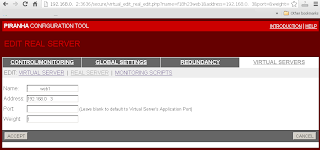
Include Real Server settings in "Virtual Servers"->"Real Server".
On each time the Piranha Gui was changed, have to sync the settings to Backup Routers, and restart the pulse service on both routers.
[root@lvsrouter ~]# yum groupinstall "Load Balancer"
================================================================================
 Package         Arch        Version                         Repository    Size
================================================================================
Installing:
 ipvsadm         x86_64      1.25-10.el6                     base          41 k
 piranha         x86_64      0.8.6-2.el6_4.1                 updates      623 k
Installing for dependencies:
 libedit         x86_64      2.11-4.20080712cvs.1.el6        base          74 k
 libnl           x86_64      1.1-14.el6                      base         121 k
 php             x86_64      5.3.3-22.el6                    base         1.1 M
 php-cli         x86_64      5.3.3-22.el6                    base         2.2 M
 php-common      x86_64      5.3.3-22.el6                    base         524 k

Transaction Summary
================================================================================
Install       7 Package(s)

Total download size: 4.7 M
Installed size: 18 M
Is this ok [y/N]: y
Start piranha and pulse services on reboot.
chkconfig piranha-gui on
chkconfig pulse on
Set a password for piranha web
/usr/sbin/piranha-passwdAllow ports in iptables
vi /etc/sysconfig/iptables
-A INPUT -m state --state NEW -m tcp -p tcp --dport 3636 -j ACCEPT
Edit piranha config
vi /etc/sysconfig/ha/conf/httpd.confStart the piranha gui service
service piranha-gui startFor LVS router to forward network packets properly to real servers, each LVS router node must have IP forwarding turned on. Turn on packet forwarding by editing sysctl.conf:
vi /etc/sysctl.conf
net.ipv4.ip_forward = 1
Reload sysctl
sysctl -p /etc/sysctl.confStart http services on the Real Servers
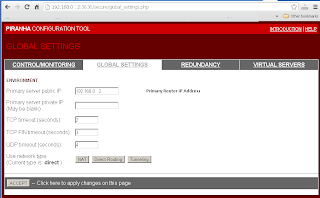
service httpd startOn the LVS Router, log in to the Piranha web ui to begin configuration. (eg http://(loadbalancer-ip):3636). Using "piranha" as user name, and key in the newly setup password. Enter Primary Router's IP address in "Global Settings"->"Primary server public IP:".

Enter Redundant Router's IP address in "Redundancy"->"Redundant server public IP:".

Enter Virtual Server settings in "Virtual Servers"->"Virtual Server".

Include Real Server settings in "Virtual Servers"->"Real Server".

On each time the Piranha Gui was changed, have to sync the settings to Backup Routers, and restart the pulse service on both routers.
service pulse restartTo see the virtual server's statistics, use "watch ipvsadm".
[root@lvsrouter ~]# watch ipvsadmCreate arptables entry for each Virtual IP address on each Real Server(eg Webserver). You can add below command to /etc/rc.local to start on every reboot. If the network adaptor on Real Server is eth0, refer to below, if not change as according:
ip addr add (virtual ip) dev eth0:1Direct Routing with arptables_jf. To configure each real server to ignore ARP requests for each of the virtual IP addresses the Piranha cluster services:
yum install arptables_jf
arptables -A IN -d (virtual_ip) -j DROP
arptables -A OUT -d (virtual_ip) -j mangle --mangle-ip-s (real_ip)
chkconfig arptables_jf on
service arptables_jf save
service arptables_jf restart
Create a loopback on each Real Server for monitoring Virtual IP.
vi /etc/sysconfig/network-scripts/ifcfg-lo:0
DEVICE=lo:0
IPADDR=(Virtual IP)
NETMASK=255.255.255.255
NETWORK=192.168.0.0
ONBOOT=yes
NAME=loopback
Tuesday 23 April 2013
PHP: Enable zlib output compression
You can enable php compression as it have a lot of benefits. It reduces the web traffic from host provider to your web. It speeds up the loading of your pages on clients PC. And it is supported by all newer web browser. All you have to do is to set "zlib.output_compression=on" in php.ini:
zlib.output_compression=on
Friday 19 April 2013
Bonnie Benchmark for ext3, ext4, xfs on CENTOS6
This benchmark was to compare the performance of ext3,ext4,xfs using CENTOS6. Bonnie++ was used to identify performance difference for the 3 filesystems on Linux.
Below were the steps and commands used to create the partitions.
For ext3 fs:
For ext4 fs:
For xfs fs:
The results:


Below were the steps and commands used to create the partitions.
For ext3 fs:
fdisk /dev/sda
mke2fs -t ext3 /dev/sda4
mount /dev/sda4 /bench -t ext3
bonnie++ -d /bench/ -c 5 -s 1G -n 32 -m ext3
For ext4 fs:
fdisk /dev/sda
mke2fs -t ext4 /dev/sda4
mount /dev/sda4 /bench -t ext4
bonnie++ -d /bench/ -c 5 -s 1G -n 32 -m ext4
For xfs fs:
fdisk /dev/sda
/sbin/mkfs.xfs /dev/sda4
mount /dev/sda4 /bench -t xfs
bonnie++ -d /bench/ -c 5 -s 1G -n 32 -m xfs
The results:
1. xfs is having highest SO_PC_KPS (Sequential Output,Per Char,k/sec).
2. ext4 is having highest SI_PC_KPS (Sequential Input,Per Char,k/sec).
3. ext4 is having highest RS_PS (Random Seek,/sec).
4. ext4 is having highest SCC_PS (Sequential Create Create, /sec).
5. ext4 is having highest SCD_PS (Sequential Create Delete, /sec).
6. ext4 is having highest RCC_PS (Random Create Create, /sec).
7. ext4 is having highest RCD_PS (Random Create Delete, /sec).
Thursday 18 April 2013
To create user account on Linux
To create a new user account, you have to login as root, and use "useradd". To change the password, use "passwd".
[root@localhost /]# useradd john
[root@localhost /]# passwd john
Tuesday 16 April 2013
How to install Varnish cache on Fedora 18
Varnish is a web accelerator in front of your web server, and it significantly speeds up web content delivery. This guide will show you how to install Varnish cache using YUM on Fedora 18. First, install Varnish and its dependencies:
After above installation, there are 2 config files to setup. "/etc/varnish/default.vcl" and "/etc/varnish/varnish.params".
If you are installing Varnish with Apache Web Server on the same hardware(localhost). Insert below config to "/etc/varnish/default.vcl".
backend default {
.host = "127.0.0.1";
.port = "80";
}
By default, Varnish is installed to listen to port 6081. The admin port is installed on port 6082.
Here is my varnish.params:
To access the cache, you can type the IP address of the server on the web browser. Assume the Varnish and Apache Web server is at 192.168.0.5.
http://192.168.0.5:6081
To bypass varnish cache, you can still reach web server (Apache) at:
http://192.168.0.5
[root@localhost ~]# yum install varnish
After above installation, there are 2 config files to setup. "/etc/varnish/default.vcl" and "/etc/varnish/varnish.params".
If you are installing Varnish with Apache Web Server on the same hardware(localhost). Insert below config to "/etc/varnish/default.vcl".
[root@localhost ~]# vi /etc/varnish/default.vcl
backend default {
.host = "127.0.0.1";
.port = "80";
}
By default, Varnish is installed to listen to port 6081. The admin port is installed on port 6082.
[root@localhost ~]# vi /etc/varnish/varnish.params
Here is my varnish.params:
# Varnish environment configuration description. This was derived from
# the old style sysconfig/defaults settings


# Set this to 1 to make systemd reload try to switch vcl without restart.
RELOAD_VCL=1


# Main configuration file. You probably want to change it.
VARNISH_VCL_CONF=/etc/varnish/default.vcl


# Default address and port to bind to. Blank address means all IPv4
# and IPv6 interfaces, otherwise specify a host name, an IPv4 dotted
# quad, or an IPv6 address in brackets.
# VARNISH_LISTEN_ADDRESS=192.168.1.5
VARNISH_LISTEN_PORT=6081


# Admin interface listen address and port
#VARNISH_ADMIN_LISTEN_ADDRESS=127.0.0.1
VARNISH_ADMIN_LISTEN_PORT=6082

# Shared secret file for admin interface
VARNISH_SECRET_FILE=/etc/varnish/secret

# The minimum and maximum number of worker threads to start
VARNISH_MIN_THREADS=5
VARNISH_MAX_THREADS=1000

# Idle timeout for worker threads
VARNISH_THREAD_TIMEOUT=120

# Backend storage specification, see Storage Types in the varnishd(5)
# man page for details.
VARNISH_STORAGE="file,/var/lib/varnish/varnish_storage.bin,1G"

# Default TTL used when the backend does not specify one
VARNISH_TTL=120

# User and group for the varnishd worker processes
VARNISH_USER=varnish
VARNISH_GROUP=varnish
After you have edited the config files, set the machine to start Varnish on reboot. And start the cache service.
[root@localhost ~]# systemctl enable varnish.service
[root@localhost ~]# systemctl start varnish.service
To access the cache, you can type the IP address of the server on the web browser. Assume the Varnish and Apache Web server is at 192.168.0.5.
http://192.168.0.5:6081
To bypass varnish cache, you can still reach web server (Apache) at:
http://192.168.0.5
Subscribe to:
Posts
(
Atom
)